Sunday, March 29, 2015

Seuss Couture


During the last two weeks I've basically put all crafting/sewing endeavors to the side to work on this.  A hat for a charity fund raiser art auction with a Doctor Seuss theme.  The MC for the event wanted to go as Oscars Only Orange Oiled Owl - I believe that is from the Seuss alphabet book.  As usual with a tight deadline I decided that a hat would get the message across and be relatively easy. The blue thing is the oil can and there is a amber bead for the oil that dangles over the owls head.  Ha, I think the owl came out cute.  She had sent for a cream coloured dress that had ostrich feathers all over it from  the waist down.  So I made a bustle type attachment that she could pin on to - kick it up a notch - in the ostrich department, LOL.  Then I made a feathered wristlet that she could wear on one of her hands to give it that elegant touch.  I find myself pushing myself to the last minute as far as getting these sort of things done.  And then you have moments like finding out that the glue you purchased the day before was no good. Then end up cursing myself for not checking while buying it because it is now 3 am in the morning (the evening before it due) and a trip to the store is NOT possible.  Which then ensues a frenzied hunt for the glue gun that is finally found after tearing through drawers and making a complete mess of things times 10.  None the less I got it done, Whew!  She made it into the salon the next day just in time for me to throw her hair up in an ostrich sort of updo and I gave her the rest of the plumage to be attached just before the auction.  I hope she got a picture of the whole getup.  
Do you ever find yourself putting things off till the last minute?  Or find yourself having to - Make It Work - as Tim Gunn says on Project Runway.  Either due to unforseen incidents or your own lack of planning etc.  I love the show Project Runway and in the midst of creating this I thought about just making it like one of the contestants crazy deadlines and had fun with it and Made it Work  :  )   

Sunday, February 15, 2015

Kitschy Kitchen Crafts


I was in Michaels arts & crafts store the other day and wondering around after I had already found what I needed to just see what was there.  Low and behold this booklet caught my eye and brought back some funny memories.   Ladies from my past had these things on their dish soap bottles.  I also remember seeing them at church craft fairs when I was younger.  They were usually sewn, crochet, or knitted in various ways.  Just the thing for using up scraps or testing out a design theory, :  ).  One of the sales girls who I always run into while shopping at Michaels was there and said, Hey-what ya makin this time?  I showed her the booklet and she laughed and rolled her eyes. I said, Hey-I'm stimulating the economy with this kitsch, LOL, she's always fun to run into.  At first I was going to knit one but then decided to give it a go with some left over scraps and some ribbons. In honor of valentines day I went with the heart theme.  The ribbon at the edge is from the dollar store, the apron itself is out of black felt, the red hearts using red felt and black ribbon for the ties.  Maybe I'll knit one of these aprons up at some point but it sure was fun remembering the ladies I knew back when.  One of the ladies was Mrs. Shirley, the Polish lady that lived across the street who used to look after us while my mom was taking classes at nite for nursing.  She had a dog named Boo and she taught me how to make these layer bar cookies that are so dang good.  I wrote to her many years later asking for the recipe.  We had long since moved away and she sent me the recipe!   She always told me, Go on eat as many as you like.  Ha, that was the first time I ever remember getting a belly ache because I ate so many.  Her husband, when the weather was nice on spring days would blast his Polish music so everyone could hear it.  They invited us over to eat out on their picnic table several times and it was the first time I'd ever had eggplant.  They were such fun neighbors.  Have you got any memories linked to past kitsch/Crafts?  Here's to Kitsch and fond memories :  )

Monday, February 9, 2015

JEEPERS CREEPERS

Have you ever been working on a project and thought you had made a mistake and then went about redoing or fixing what it was only to find out you had done it the correct way in the first place?  That's what I call a JEEPERS CREEPERS moment.  I had drafted the stand collar for the top and thought I had taken the measurements from the cutting edge of the pattern instead of the seam line.  So went and remeasured from the seam line and then drafted a second set of patterns.  After doing so I compared the new with the old patterns and saw they were the same, ACK!  So apparently I had measured correctly in the first place.  So then I decided to pin the collar into the neck opening and check things out.  I'm happy with the results although I should have stay stitched the collar opening at the get-go.  I only decided to stay stitch the collar opening after I had tried on the top a BA-GILLION times.  So I'm sure there is some stretching that has happened and plus the top is pinned and not sewn on the accurate seam line.  Here's a pic of the collar test fitting.
This is the collar with the top collar and facing all in one.  Still at the front there is a gap of 3/8 ".  Which may be due to the collar partly stretching a bit before stay stitching as well as improper seam allowance pinned at the sholders . Once I actually decide on how I'm going to treat the neck opening Then I can decided on the final collar.

Here is a pair of pants that I've been hemming for quite some time now.  For what ever reason I had no problem volunteering at the opera and hemming loads of pants, hems and petticoats but when it comes to hemming my own jeans I'm a slacker, Ha.  These are being hemmed by hand with an orange thread.  I think its cool to use a contrasting thread on the hem of some pants.  I'm not sure what it is but when volunteering at the opera I really enjoyed being given a set of tasks to do (such as hemming several pants etc) and then taking the challenge to get it all done by the end of the day.  I think what I enjoyed the most was the social aspect of it as well as the having to meet a deadline.  For what ever reason I'm a slacker when it comes to my own sewing.  There are several times when I've worn things I've made that were either just basted, pinned or glued just because I couldn't wait to wear it.   Nobody knew the difference at least I hope they didn't.  A friend once commented that it was charming at how i'd leave the tails hanging from the crochet projects I had sitting around.  Funny I could see that I had left the tails hanging off these things but for some reason I didn't sew them in and it wasn't until he had said something that I thought maybe i should get around to that.  I guess i'm a bit of a sampler sorta guy trying this and that here and there.  Curiosity gets the best of me then I throw myself into something and then I sometimes find myself loosing steam.  I think what it is for me I've found community in the things I've learned and have been curious about and that for me its the high point of it all.  Wether I always come away with something that has been completed isn't always the case.  Now that I think of it, the first time I ever felt like someone really payed attention to me or encouraged me to be myself and try things out was in art class.  I remember when very young in art class we had all this big fluffy yarn and were supposed to pick a picture out of the colouring book and then glue on the yarn to make a yarn picture.  I chose an elephant with spots and then the yarn I wanted to use was this soft pink yarn and fushia coloured for the spots and blue for his eyes.  I heard several comments about me wanting to use pink.  Boys don't use pink, is what another student said.  Probably because someone told him that.  I still liked it and my teacher was the one who came over and encouraged me to do what I was doing and that there was nothing wrong with it.  I loved her for that.  Then there was the time we were in music class and our teacher had asked us to ask our moms for a scarf to bring.  My mom kept asking me what do you need a scarf for.  I wasn't sure but I said the teacher wanted us to bring one so she gave me one to bring.  One of those sheer scarfs with some sort of floral print on it was what she gave me to take.  So the day arrived and there we were in music class with our scarfs.  The teacher put on some music and we were supposed to all go around in a circle holding onto two ends of the scarf and let it float in the air behind us as we all danced around in a circle.  We were supposed to be butterflies.  All the girls didn't hesitate.  They all fell into formation and started fluttering around to the music.  I started to fall into formation but hesitated because I noticed none of the other boys were going along with it.  I stopped and looked back at my teacher.  She said go on be the butterfly.  So there I went into the circle with all the other butterflies. It was fun!  Just for that moment I wasn't being told that I'm not being who I should be or I don't fit what other people think I should be.  I felt so free :  ).  I haven't thought of that in years.  Perhaps its because all the things I've been learning and working on are all just part of a process.  A process of becoming who we are an evolution of the self.  I never thought that art/crafts could teach me something like that.  Every time I work on something or learn some new project I learn something about myself and the people I'm with.  That's what I like about blogs you can see the story behind the picture.  Every project, finished or not has a story behind it  :  )

Monday, February 2, 2015

ACK, I just wanna feel better

This cold/flu bug has been a doozy.  I just want to feel better.  Can I get some sunshine please.  I'm running outta tissues and don't have the gumption to get out and get more.  Wha, Wha, Wha.  Well, thank heavens for ginger, lemons and honey.  Did you know you can multi-task and give yourself a facial steam and hydrate your sinus's all while sitting over a large hot cup o tea.  It's divine I tell you.  My skin looks great and my hairs looking fabulous (all full and tosselled) from all the tossing and turning I've been doing while hybernating under the covers. I tell everyone that my pillow does my hair now, LOL.  Just wish I felt better.  Any who, in the meantime I've managed to work on some stuff.


   I've been working on the pattern drafting of this stand collar for the purple top.  I used 4 methods for drafting the patterns and decided on two methods from Adele Margolis's book, Make Your Own Patterns.  She gives two methods one for where you draft the collar with a seperate facing and the other is a one piece collar with the upper and under collar all in one.  I like the collar that has the upper and under collar all in one the best.  Above you will see a pic of the books I used as reference and then the two paper patterns created using the methods described in Margolis's book.  Note to self, make sure you take measurements for the collar from the sewing line and not the cut edge of the pattern before drafting the collar.  I had to redraft the collars since this was the mistake I made.  I made a mock up of the collar that is too small to just see how it worked up and here it is.
This is the one piece upper and under collar all in one pattern and I really like it.  I've just got to remake it out of the new proper sized pattern.  Then there was the matter of interfacing this thing or not.  After much reading I decided on a sew in woven interfacing.  I'll have to admit that I am a bit of a slacker when it comes to ironing and I probably should iron a lot more than I do when making a project.  Something about ironing glue into the collar doesn't appeal to me.  Next will be the opening for the shirt.  Some sort of placket.  Still not sure how I'll tackle that but stay tuned :  ) to see what happens with that.
Here is one of my favorite crafty tools that is so handy when working with patterns.  At least when it comes to collars and smaller pattern pieces.  It's an improvised light box.  A window works well too on a sunny day if you tape your pattern to the window you can see the pattern lines thru the paper and trace it off that way as well.  This is one of those scrapbooking paper keepers from the craft store. If you get one make sure it has a smooth flat surface.   It's approximately 14" by 14".  Holiday lights bought on sale put inside provide the artificial sunshine for helping you to see the pattern lines thru the paper.  This is what I used for the final collars when tracing them off from the drafts. I keep a roll of washi tape in the box so its there when I need to secure the paper to the surface before tracing.

  If that's not enough to keep one busy while stuck in the cabin.  Here's more  :  ).  Above is a sketching class I took by Lisa Congdon over on creativebug .  I love this class!  Above you see where she suggests using scraps of paper to encourage you to create your sketches from.  The paper pieces (recycled envelopes from the holidays) are cut and glued in various places and used as part of the design.  This class has really helped me to push past being intimidated by the blank page and Lisa Congdon gives several ideas for helping to get your sketch on.  I'll post more about the sketching class later.
Also, I've been channeling these ladies from my sewing machine, LOL.  I'd sit down to just doodle on the sewing machine and for some reason I get these ladies.  It's fun to find different ways to doodle.  Do you doodle?

Monday, January 26, 2015

It's Curtains for me....

Nope fooled ya.  It's actually a bedspread that I'm using/wearing for my latest project  :  ).  Remember Scarlet and her drapes and Lucy and Ethel in their very stylish burlap bags in Paris.  Well, when practicing your skills or just when in a pinch for something to wear we crafters get thrifty and make do with what we have.  There are plenty of fabrics out there in your local thrift that can function as either a practice run fabric or the material that makes it as the final wearable creation. So here is the 5th in a series of fittings.  The first 3 test samples were out of gingham fabric that I bought at the thrift.  Once I had cut that all up I started eye balling my bed spread and it was so perfect for this project since it is an Indian print and this top is a kurti/kurta type garment.  My friend Pattie was nice enough to humor me with taking my picture in this get up.


So here you have the front and back of this fitting.  One of my favorite things to do is to safety pin a garment together for a fitting.  You can take it on and off without getting stuck by the pins.  Here you see the sleeve cap with the safety pins used along the seam line.  So the whole garment is safety pinned together along the seam line and then you can try it on and alter it if needed by just moving the pins.  I'm thinking this may need a bit more length at the bottom.  In drafting the pattern from the class taught by Cal Patch on www.creativebug.com she gave info on how to include a dart in the top pattern as well.  I didn't include it in this top since I wanted more room and with this patterned fabric I'm not sure it would work. Now I have to decide on how to treat the neck opening with a placket of some sort.  I've already drafted a stand collar using 3 different techniques and will show that later once I decide on the way to do the placket/front opening.
 Here is a pic of the gingham versions that preceded the purple bedspread version.  The fit was too tight on these but it is a great basic shell that could be used for knits.  I'm pleased with the fit and the sleeve came out better than I thought it would.  The nice thing about using a bedspread/sheet etc. is that you can work with pattern layout and line up the hems on the already finished edges of the fabric and avoid having to do any hemming.
  My challenge for 2015 is to take this pattern into many different versions of itself basically to morph it into many other garments and see where I can take it.  Hopefully I can avoid being overly critical of myself and just have fun with it.  Often I find myself getting bogged down by the, It's not going to be perfect enough, critical talk and find myself never finishing anything.  So here's to 2015 the year of getting it done and having fun : )

Sunday, January 18, 2015

It's 2015 already!

Where has all of 2014 gone?  The holidays seem a bit of a blur.  Business has been booming and has left little time for, adding to the pot, so to speak of Craftspacecontinuum.  Not to mention the time taken off for the holidays, mom and I both being sick and then having to play catch up after having to take off so much time it has just been one big ole, how do you git er done-palooza, ACK!  But there have been many small increments of time that allowed for bits here and there to be added to the pot of creativity.  Lets see whats in the pot.
 Here are a bunch of knitting samplers that have been helping me make it thru the dark bleek nites of winter.  creative bug is where I took a class by Debbie Stoller (famous author of the Stitch and Bitch knitting books) on knitting a sampler and it was the perfect thing to help me unwind at the end of the day.  They were fun to make and I learned so much that I now feel confident that I could design something myself with the knowledge gained from making these samplers.  These are all pinned to what is my favorite craft tool of all.  Its a foam core board that is covered on both sides with felt.  One side is a brite yellow very much like the sampler on the lower left of the board and the other side is this medium gray colour.  All I did is take the board lay it on one of the pieces of felt cut out the felt with a generous boarder and then fold over the edges and duct taped them down then turned the board over and cut out the other piece of felt with a generous boarder and folded back the edges and just used glass head pins to secure it to the other side so that you have a two sided board for pinning and displaying your work projects.  Then there are all the experimental knits that I worked on just because I needed something to do.
 Ack, this knitted pile of stuff has gotten out of control.  Its a basket-o-hats with a few UFO's in there.  I'm not exactly sure whats in the bottom of this basket.  On the to do list for 2015 is to deal with this.  Every time I turn around there is this staring at me (pic below), ACK!  Another pile of started, finished, to be started projects to be dealt with.  When it gets cold out, its raining and not very sunny then stuff starts to pile up and get undone.  It just lies around like snow waiting to melt away till the next ray of inspiration strikes :  ).  Here's wishing everyone a GREAT 2015!

Sunday, November 9, 2014

Holding Pattern literally : )

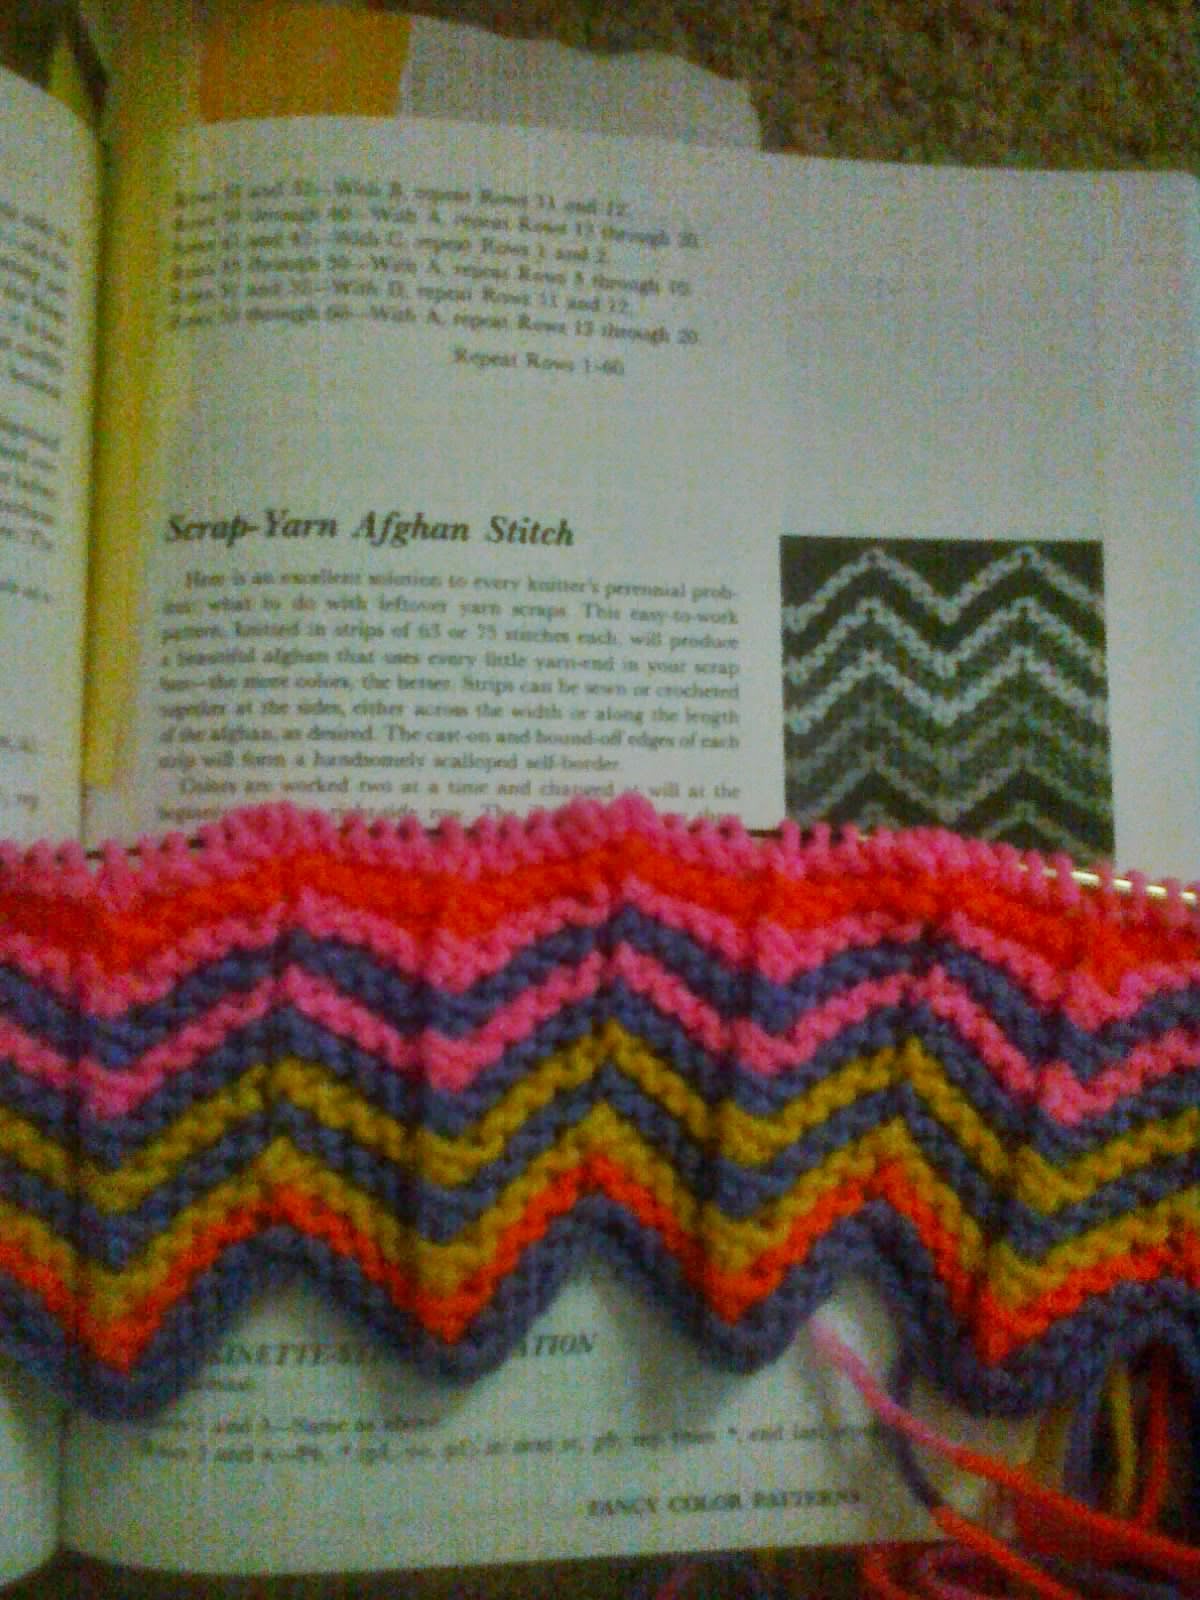
This blog will be in a temporary chevron/zig zag holding pattern until further notice  :  ).  Here's a sample of knitting I've been working on using up leftover yarns.  I've been wanting to knit a zig zag pattern for awhile now and just haven't found a pattern for it that I was happy with until now.  I found the directions for this pattern stitch in one of Barbara G. Walkers books - A Second Treasury of Knitting Patterns.  It's called the Scrap-Yarn Afghan Stitch.
Here you have the beginning of the swatch and the book open to the page with the pattern.  It's an easy stitch to do and great for using up scraps.  In this picture the blue showed up more like a gray colour but it is more of a blue like in the top swatch photo.  So that is it for now.
  With the holidays approaching there has been a reshuffle of the things to get done before the end of the year.  Where did the time go. Once I figure out what will be worked on and HAS to be done before the holidays then I'll start posting again.  So until then TTFN and have a great weekend! everyone!